Learn how to efficiently create and manage quotes in HubSpot with this comprehensive step-by-step guide.
To begin creating a quote in HubSpot, the first step is to navigate to the Quotes section. Start by clicking on the gear icon to access the settings. From there, scroll down to the "Objects" section and find the "Quotes" option. This is where you'll manage all the settings related to creating and customizing quotes.
To create quote:
- In your HubSpot account, navigate to Commerce > Quotes.
- Click Create quote.
- Navigate to your record:
- In your HubSpot account, navigate to CRM > Contacts.
- In your HubSpot account, navigate to CRM > Companies.
- In your HubSpot account, navigate to CRM > Deals.
- Click the name of the record you want to create the quote from.
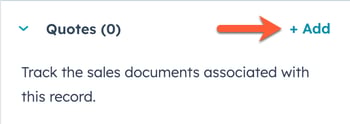
- In the right sidebar, in the Quotes section, click Add.
Building and sending your quote
After creating your quote, it's built using a step-by-step process detailed below. You can click Save at any time during the quote building process to save it as a draft, and click Exit, returning to finish building the quote later.
Deal
Associate your quote to a new or existing deal.
- To associate the quote with an existing deal, or to create a new deal for the quote, click the Associate with a deal dropdown menu and select an existing deal,
- To create a new deal for the quote, click the Associate with a deal dropdown menu and select Create a new deal.
- In the right panel, enter the details of the deal.
In the Quotes section, you have several important settings to define. These settings will help streamline your quoting process and ensure consistency across all your quotes. Let's dive into some of them next.
Setting Default Expiration Periods and Payment Options
One of the key settings you'll need to configure is the default expiration period for quotes. This can be set to a predefined number of days, such as 90 days, or customized according to your needs. The expiration period ensures that quotes remain valid for a specific timeframe, providing a clear deadline for clients to respond.
Another important setting is the option to allow payments for unassigned quotes. When enabled, this feature allows quotes using the e-signature feature to be paid even if they are not formally signed. This can be particularly useful for speeding up payment processes.
Additionally, you can choose to display the total contract values on quotes. This setting allows you to define whether the default quote value should be the quote amount or the total contract value, which includes all revenue generated from a customer, including fees and one-time payments.
Customizing Quote Templates for Your Business
Customizing quote templates is a crucial aspect of making your quotes look professional and aligned with your brand. HubSpot offers several default templates, including a customizable flow template that allows for greater personalization.
When editing a quote template, you can:
- change the banner image and override the default logo
- customize the text for various sections, such as the quote creation date and sender company information
- add tokens to dynamically populate fields with relevant information, ensuring that each quote is personalized for the recipient.
It's important to make sure that all necessary information, such as the recipient company's name and address, is included in the contact or company record. Missing information can result in placeholders or blank spaces, which can look unprofessional.
Adding and Managing Line Items in Quotes
Line items are the core components of any quote, detailing the products or services being offered. In HubSpot, you can add line items from your product library or create custom line items. The product library should be populated with all the products and services your company offers, making it easy to select and add them to quotes.

Each line item includes details such as billing frequency, quantity, unit price, and any applicable taxes. You can add up to six line items per quote, ensuring that all relevant details are included. Additionally, you can specify properties like tax categories and payment start dates.
It's also possible to hide certain modules, such as future payment summaries or payment schedules, if they are not relevant to a particular quote. This helps keep the quote clean and focused on the essential information.
Utilizing E-Signatures for Seamless Approvals
E-signatures are a powerful feature in HubSpot that streamline the approval process for quotes. Depending on your HubSpot plan, you have a limited number of e-signatures available per seat—10 for Sales Hub Pro and 30 for Enterprise.
When creating a quote, you can choose to include an e-signature option. This can be set to no signature, a space for a written signature, or an e-signature. Including an e-signature option makes it easy for clients to approve quotes digitally, speeding up the sales process.
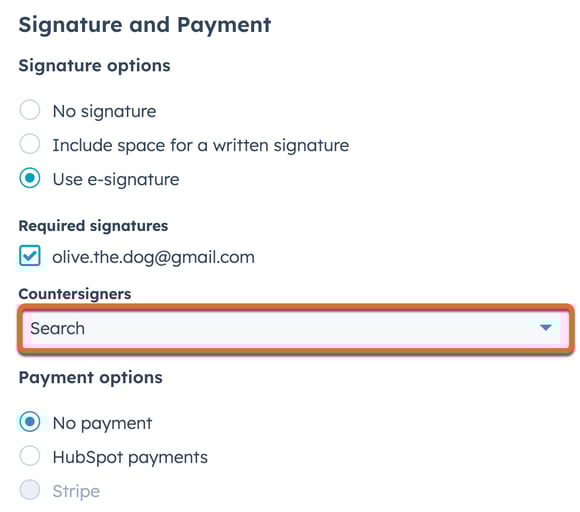
If e-signatures are not needed for a particular quote, you can disable this option. However, it's essential to ensure that the signature section is properly configured, as it cannot be hidden in the quote template itself.
Finalizing and Sending Your HubSpot Quote
Once all the necessary information has been added and customized, it's time to finalize and send the quote.
- Start by associating the quote with a deal, contact, and company. If needed, you can add additional contacts to the quote.
- Review all the details in the quote, including line items, payment options, and any custom terms or conditions. You can add comments or purchase terms to provide additional context or instructions for the recipient.
- Generate a link for the quote. This link can be included in an email or copied directly and sent to the client. The client can then review, approve, and pay for the quote using the provided link.
By following these steps, you can efficiently create, customize, and manage quotes in HubSpot, ensuring a streamlined and professional quoting process for your business.